Every organization I have worked with was under pressure to release the product sooner, sending faster updates and bug fixes. Although there are many factors that contribute to the development speed, one thing which always slowed me down is writing the boilerplate code. In a usual project, it can consist of up to 30% of the total code. This makes me wonder if there is a way possible to generate these codes. Which brought me to Mason. So what is Mason?
Mason enables developers to create and consume reusable templates called bricks.
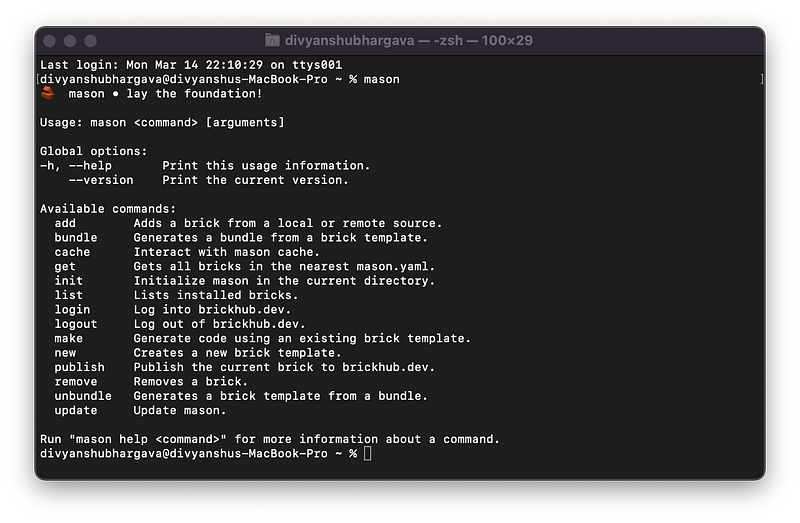
Basically, Mason is a template generator where each template is called bricks. Mason provides Mason CLI to create and consume these templates.
Although Mason is written in dart and it’s gaining popularity in the Flutter community but it can be used to generate templates for any language. Let’s see how we can use this in our project to speed up our development.
Installation
Mason can be installed either with the dart pub or brew.
# 🎯 Activate from https://pub.dev
dart pub global activate mason_cli
# 🍺 Or install from https://brew.sh
brew tap felangel/mason
brew install masonMason provides quite a few commands to build templates.
Initialisation
Once you’ve installed mason_cli you can go into the root folder of your project and initialize mason.
mason initThis will generate the mason.yaml file in your project which contains metadata for all your bricks.
# Register bricks that can be consumed via the Mason CLI.
# https://github.com/felangel/mason
bricks:
  # Sample Brick
  # Run `mason make hello` to try it out.
  hello: 0.1.0+1
  # Bricks can also be imported via git url.
  # Uncomment the following lines to import
  # a brick from a remote git url.
  # widget:
  #   git:
  #     url: https://github.com/felangel/mason.git
  #     path: bricks/widget
Bricks 🧱
Bricks simply are customizable reusable templates that can generate code with dynamic variables. These brick templates can be stored locally in the project, remotely in git, or can be published to the brickhub.
Mason uses mustache, a logic less template syntax. To know more about mustache check this documentation.
A new brick template can be created with the mason new command.
mason new -d
mason new cubit -d "A new cubit template"
✓ Created new brick: cubit (0.0s)
✓ Generated 5 file(s):
  /Users/divyanshubhargava/bricks/cubit/brick.yaml (new)
  /Users/divyanshubhargava/bricks/cubit/README.md (new)
  /Users/divyanshubhargava/bricks/cubit/CHANGELOG.md (new)
  /Users/divyanshubhargava/bricks/cubit/LICENSE (new)
  /Users/divyanshubhargava/bricks/cubit/__brick__/HELLO.md (new)
Each brick template consists of the following files and folders.
__brick__directory: All your template files are added to this Directory.bricks.yaml: A metadata file for your brick template.
name: cubit
description: A new cubit template
# The following defines the version and build number for your brick.
# A version number is three numbers separated by dots, like 1.2.34
# followed by an optional build number (separated by a +).
version: 0.1.0+1# The following defines the environment for the current brick.
# It includes the version of mason that the brick requires.
environment:
mason: ">=0.1.0-dev
get props => [];
}{{#snakeCase}}{{name}}_cubit{{/snakeCase}}.dart
import 'package:equatable/equatable.dart';
import 'package:flutter_bloc/flutter_bloc.dart';
part '{{#snakeCase}}{{name}}_state{{/snakeCase}}.dart';class {{#pascalCase}}{{name}}Cubit{{/pascalCase}} extends Cubit
{
{{#pascalCase}}{{name}}Cubit{{/pascalCase}}() : super(const {{#pascalCase}}{{name}}State{{/pascalCase}}());}In --test -> cubit -> \{\{#snakeCase\}\}\{\{name\}\}\{\{/snakeCase\}\} we will create a cubit test class.
\{\{#snakeCase\}\}\{\{name\}\}_cubit_test\{\{/snakeCase\}\}.dart
import 'package:bloc_test/bloc_test.dart';
import 'package:mason_demo/cubit/{{#snakeCase}}{{name}}{{/snakeCase}}/{{#snakeCase}}{{name}}_cubit{{/snakeCase}}.dart';
void main() {
blocTest(
'emits [] when nothing is added',
build: () => {{#pascalCase}}{{name}}Cubit{{/pascalCase}}(),
expect: () => [],
);
}Now we are done with our templates let’s add them to mason.yaml.
bricks:
  #Bricks
  cubit:
    path: bricks/cubit
Installing Bricks
To install bricks simply run the mason get command.
Generating code
This is where the magic happens. Every time we need to create a new cubit we can simply run the mason makes cubit command.
mason make cubit? What's the cubit name? (Dash) Auth
✓ Made brick cubit (0.1s)
✓ Generated 3 file(s):
/Users/divyanshubhargava/StudioProjects/mason_demo/test/cubit/auth/auth_cubit_test.dart (identical)
/Users/divyanshubhargava/StudioProjects/mason_demo/lib/cubit/auth/auth_cubit.dart (new)
/Users/divyanshubhargava/StudioProjects/mason_demo/lib/cubit/auth/auth_state.dart (new)Voilà, within a fraction of seconds we can generate all our cubit files.
auth_cubit.dart
import 'package:equatable/equatable.dart';
import 'package:flutter_bloc/flutter_bloc.dart';
part 'auth_state.dart';class AuthCubit extends Cubit
{
AuthCubit() : super(const AuthState());}auth_state.dart
part of 'auth_cubit.dart';class AuthState extends Equatable {
const AuthState();@override
List
get props => [];
}auth_cubit_test.dart
import 'package:bloc_test/bloc_test.dart';
import 'package:mason_demo/cubit/auth/auth_cubit.dart';
void main() {
blocTest(
'emits [] when nothing is added',
build: () => AuthCubit(),
expect: () => [],
);
}Adding conditions
One thing which I found really helpful while generating code is to able to have conditional code. For example, if you want to generate a new cubit and state class without Equatable. To do so let’s add a new variable calleduseEquatable in our brick.yaml file.
useEquatable:
    type: boolean
    description: Use Equatable
    default: false
    prompt: Do you want to use Equatable?
Now wrap the Equatable code in useEquatable variable.
{{#useEquatable}}
// Your code
{{/useEquatable}}
Finally, this is how our state’s class looks like.
part of '{{#snakeCase}}{{name}}_cubit{{/snakeCase}}.dart';class {{#pascalCase}}{{name}}State{{/pascalCase}} {{#useEquatable}}extends Equatable{{/useEquatable}} {
const {{#pascalCase}}{{name}}State{{/pascalCase}}();{{#useEquatable}}
@override
List
get props => [];
{{/useEquatable}}
}Some useful mason commands
List installed Bricks
mason list//ormason lsAdd Bricks
mason add
Remove Bricks
mason remove
What’s next?
What we have done here is just the tip of the iceberg. With Mason, you can achieve a lot.
Here is the full working example of this tutorial -> Mason_Demo
I would highly recommend you to check out the mason repo for a more detailed view and the latest changes.
Thank you for reading 👋
I hope you enjoyed this article. If you have any queries or suggestions please let me know in the comments down below.
You can connect with me on Twitter, Github, and LinkedIn. You can subscribe to my newsletter to get an email notification for my latest articles.
Happy Coding… See you next time 👋